
Introduction
Katsu is a beloved Japanese dish known for its crispy, golden exterior and savory flavor. Traditionally made with breaded and fried pork cutlets, katsu has won the hearts of food lovers around the world, becoming a staple in Japanese cuisine. This dish is not just about taste; it embodies comfort, nostalgia, and the warmth of home-cooked meals. In Japanese culture, comfort food plays a significant role, providing nourishment and joy, and katsu is no exception.
In this recipe, we present a unique twist on the classic katsu bowl that enhances its traditional flavors while introducing exciting new components. Imagine a vibrant bowl filled with crunchy katsu, fresh vegetables, and a rich, tangy sauce that elevates the entire experience. This modern interpretation combines the essence of katsu with a fresh take that is sure to delight your taste buds and impress your guests. Prepare to dive into a satisfying meal that balances crunch, flavor, and nutrition—all in one bowl.
Understanding Tonkatsu
Definition and Origins of Tonkatsu
Tonkatsu, the classic Japanese dish from which katsu derives, consists of a breaded and deep-fried pork cutlet, served with shredded cabbage and a tangy sauce. The term “tonkatsu” combines “ton” (), meaning pork, and “katsu” (), which is short for “katsuretsu” (), the Japanese pronunciation of the French word “côtelettes” (cutlets). The origins of tonkatsu date back to the late 19th century during the Meiji era, when Western-style cuisine began to make its way into Japanese kitchens.
As the dish gained popularity, it evolved into various forms, with each region in Japan putting its unique spin on the recipe. Today, tonkatsu is often served with rice and a side of miso soup or pickles, making it a hearty and fulfilling meal.
Traditional vs. Modern Interpretations of Tonkatsu
While traditional tonkatsu focuses on the simple yet delicious breaded pork cutlet, modern interpretations have expanded to include a range of proteins and creative presentations. You’ll find chicken katsu, tofu katsu, and even vegetable katsu becoming popular alternatives, catering to diverse dietary needs and preferences.
In our crunchy katsu bowl, we embrace this modern approach, presenting a colorful assembly of fresh ingredients that complement the crispy katsu. By incorporating seasonal vegetables, grains, and a flavorful twist on the classic tonkatsu sauce, we create a dish that is not only visually appealing but also nutritious and satisfying.
Nutritional Benefits of Incorporating Pork and Vegetables in Meals
Incorporating pork and vegetables into your meals has numerous nutritional benefits. Pork, particularly lean cuts like tenderloin, is an excellent source of high-quality protein, essential for muscle growth and repair. It also provides vital vitamins and minerals such as B vitamins, zinc, and iron. These nutrients play a crucial role in maintaining energy levels, supporting the immune system, and promoting overall health.
Vegetables, on the other hand, are packed with vitamins, minerals, fiber, and antioxidants. By adding a colorful array of vegetables to your katsu bowl, you enhance the nutritional profile of the meal, ensuring a balanced intake of nutrients. This combination provides the body with the necessary fuel while offering a satisfying meal that does not compromise on flavor.
Ingredients Breakdown
Overview of the Main Components
The beauty of katsu bowls lies in their simplicity and versatility. In this recipe, we break down the main components that make this dish a standout:
1. Tonkatsu: The star of the dish, this crispy breaded pork cutlet, serves as the protein base.
2. Tonkatsu Sauce: A key element that brings everything together, the sauce adds a rich, tangy flavor that enhances the katsu.
3. Bowl Assembly: The final touch includes a colorful medley of fresh vegetables, grains, and any additional toppings you desire.
Highlighting the Importance of Quality Ingredients
To achieve authentic flavors in your crunchy katsu bowl, the quality of your ingredients matters immensely. Using fresh, high-quality pork and vegetables will make a noticeable difference in the overall taste and enjoyment of the dish. When selecting your pork, look for cuts that are well-marbled for tenderness and flavor.
For the best results, you should also opt for high-quality panko breadcrumbs, as they provide the perfect crunch and texture. Fresh, seasonal vegetables not only enhance the flavor but also add a nutritious boost to the meal.
Versatility of Ingredients and Possible Substitutions
One of the great advantages of katsu bowls is their versatility. You can easily customize the ingredients based on dietary preferences or what you have on hand. Here are some possible substitutions:
– Protein Alternatives: If you prefer a lighter option, you can substitute pork with chicken breast or even tofu for a vegetarian version. Chicken katsu is equally delightful, while tofu katsu offers a great plant-based alternative that absorbs flavors beautifully.
– Gluten-Free Options: For those with gluten sensitivities, there are gluten-free breadcrumbs available that can be used in place of traditional panko. Additionally, you can create a homemade tonkatsu sauce using gluten-free soy sauce to maintain the flavor profile without compromising dietary needs.
Preparing the Tonkatsu Sauce
Detailed Instructions on Making the Tonkatsu Sauce
The tonkatsu sauce is a crucial component of this dish, as it complements the crispy cutlet and adds a depth of flavor that ties all the elements together. Here’s how to prepare it:
Ingredients for Tonkatsu Sauce:
– 1/2 cup ketchup
– 1/4 cup Worcestershire sauce
– 2 tablespoons soy sauce
– 1 tablespoon mirin (sweet rice wine)
– 1 tablespoon sugar (adjust to taste)
– 1 teaspoon Dijon mustard (optional for an extra kick)
Instructions:
1. In a small mixing bowl, combine the ketchup and Worcestershire sauce.
2. Stir in the soy sauce and mirin, mixing until well incorporated.
3. Add the sugar and Dijon mustard if using, and whisk until the sugar dissolves completely.
4. Taste the sauce and adjust the sweetness or tanginess by adding more sugar or Worcestershire sauce according to your preference.
5. Set aside the tonkatsu sauce to allow the flavors to meld while you prepare the rest of the dish.
Explanation of Each Ingredient’s Role in Balancing Flavors
Each ingredient in the tonkatsu sauce plays a vital role in achieving the perfect balance of flavors:
– Ketchup: Provides the base sweetness and tanginess, contributing to the sauce’s overall flavor profile.
– Worcestershire Sauce: Adds depth and umami, enhancing the richness of the sauce.
– Soy Sauce: Introduces a savory note while also providing a hint of saltiness.
– Mirin: A touch of sweetness, mirin balances the acidity of the ketchup and brings a delicate flavor.
– Sugar: Depending on your taste, sugar can be adjusted to achieve the desired sweetness, ensuring a rounded flavor.
– Dijon Mustard: Optional but adds a subtle heat and complexity to the sauce, elevating it beyond traditional flavors.
Tips for Customizing the Sauce to Taste Preferences
Feel free to experiment with the tonkatsu sauce to suit your taste preferences. If you enjoy a spicier kick, consider adding a splash of sriracha or a pinch of cayenne pepper. For a sweeter sauce, increase the amount of sugar or mirin.
Additionally, you can incorporate other ingredients such as grated apple or pear for a fruity twist, which is a common variation in some regions of Japan. The key is to balance the flavors according to your palate, ensuring that the sauce perfectly complements the crunchy katsu.
Crafting the Perfect Tonkatsu
Now that we’ve prepared the sauce, it’s time to focus on crafting the perfect tonkatsu. The key to a truly crispy and delicious katsu lies in the preparation and frying technique. This section will guide you through the steps needed to achieve that ideal crunchy texture.
Ingredients for Tonkatsu:
– 1 pound pork loin or tenderloin, cut into 1-inch thick slices
– Salt and pepper to taste
– 1/2 cup all-purpose flour (or gluten-free flour)
– 2 large eggs, beaten
– 1 cup panko breadcrumbs
– Vegetable oil, for frying
Step-by-Step Instructions for Crafting Tonkatsu
1. Prepare the Pork: Start by patting the pork slices dry with paper towels. This step is crucial for achieving a crispy exterior. Season both sides of the pork with salt and pepper, allowing the flavors to penetrate the meat.
2. Dredging Station: Set up a dredging station by placing the flour, beaten eggs, and panko breadcrumbs in three separate shallow dishes. This setup will streamline the coating process.
3. Coat the Pork: First, dip each pork slice into the flour, ensuring it is evenly coated. Shake off any excess flour. Next, immerse the floured pork into the beaten eggs, allowing the excess to drip off. Finally, coat the pork in panko breadcrumbs, pressing gently to ensure an even layer adheres to the meat.
4. Frying: Heat about 1/2 inch of vegetable oil in a large skillet over medium-high heat. To test if the oil is ready, drop a few panko crumbs into the oil; they should sizzle immediately. Carefully place the breaded pork slices into the hot oil, ensuring not to overcrowd the pan.
5. Cook Until Golden: Fry the pork for about 3-4 minutes on each side, or until the exterior is golden brown and crispy. Adjust the heat as necessary to prevent burning. Once cooked, transfer the tonkatsu to a paper towel-lined plate to drain any excess oil.
6. Slicing: Allow the tonkatsu to rest for a few minutes before slicing it into strips. This resting period helps retain the juices within the meat, ensuring each bite remains tender and flavorful.
With the tonkatsu prepared and the sauce ready, you’re well on your way to assembling your crunchy katsu bowl with a twist. Each component plays a vital role in creating a harmonious dish that celebrates traditional Japanese flavors while incorporating modern culinary creativity. Stay tuned for the next part of this article, where we will explore the art of assembling the perfect katsu bowl and adding those delightful finishing touches.
Step-by-Step Guide to Preparing the Pork Chops
To create truly delicious Crunchy Katsu Bowls, the foundation lies in the preparation of the pork chops. The right techniques will ensure a tender, flavorful, and crispy result that will have everyone reaching for seconds.
Proper Seasoning and Flattening for Texture
1. Selecting and Seasoning the Pork Chops
Start with boneless pork chops, preferably around 1-inch thick. This thickness allows for even cooking while maintaining juiciness. To season, sprinkle both sides generously with salt and pepper. For added depth, you can also incorporate garlic powder, onion powder, and a hint of paprika for a subtle smokiness. Let the seasoned chops rest for about 15-20 minutes at room temperature. This step not only enhances flavor but also ensures even cooking.
2. Flattening the Pork Chops
To achieve that iconic Katsu texture, you need to flatten the pork chops. Place each chop between two pieces of plastic wrap or parchment paper. Using a meat mallet or rolling pin, gently pound the chops until they are about half an inch thick. Flattening the meat helps tenderize it and creates a larger surface area for the breading to adhere, leading to a crunchier exterior once cooked.
Breading Technique and Its Impact on Crunchiness
A proper breading technique is crucial for achieving that signature Katsu crunch. The three-step breading process—flour, egg, and panko—creates layers of texture.
1. Prepare the Breading Station
Set up your breading station with three shallow dishes. In the first dish, add all-purpose flour seasoned lightly with salt. The second dish should contain beaten eggs, and in the third, place panko breadcrumbs. Panko is essential; its light and airy texture creates a superior crunch compared to regular breadcrumbs.
2. The Breading Process
Begin by dredging each flattened pork chop in flour, ensuring it is coated evenly. Shake off any excess flour. Next, dip the floured chop into the beaten eggs, allowing any excess to drip off. Finally, coat the chop with panko breadcrumbs, pressing down gently to ensure the crumbs adhere well. Repeat this process for all the pork chops.
Best Practices for Frying
Frying is where the magic happens, transforming your breaded chops into golden, crunchy pieces of perfection.
1. Temperature Control
Heat a large skillet over medium heat and add enough oil to cover the bottom of the pan (about ¼ inch deep). The ideal frying temperature is around 350°F (175°C). To test if the oil is ready, sprinkle a few breadcrumbs into the pan. If they sizzle and bubble, you’re good to go.
2. Oil Selection
Choose an oil with a high smoke point, such as vegetable oil, canola oil, or peanut oil. These oils not only handle high temperatures well but also impart a neutral flavor that won’t overpower the dish.
3. Safety Tips
When frying, be cautious of splattering oil. Avoid overcrowding the pan; fry the pork chops in batches if necessary to maintain the temperature of the oil. Cook the chops for about 3-4 minutes per side until they are golden brown and cooked through. Use a meat thermometer to check that the internal temperature reaches 145°F (63°C). Once cooked, transfer the chops to a wire rack or paper towels to drain any excess oil.
Assembling Your Katsu Bowl
Now that your pork chops are perfectly cooked, it’s time to assemble the Katsu Bowls for an attractive presentation that’s sure to impress.
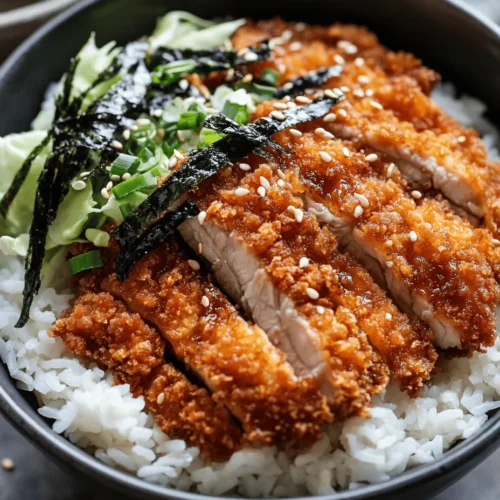
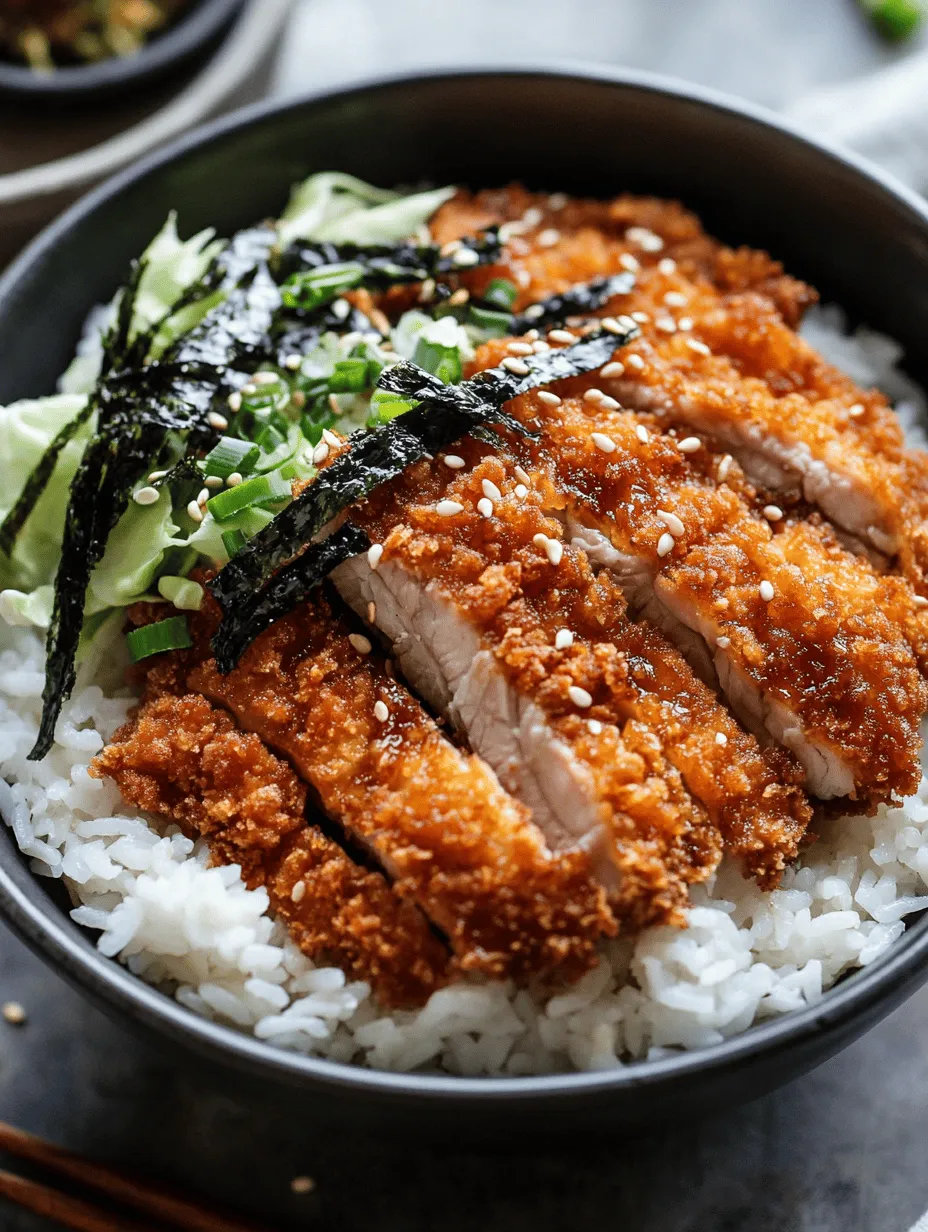
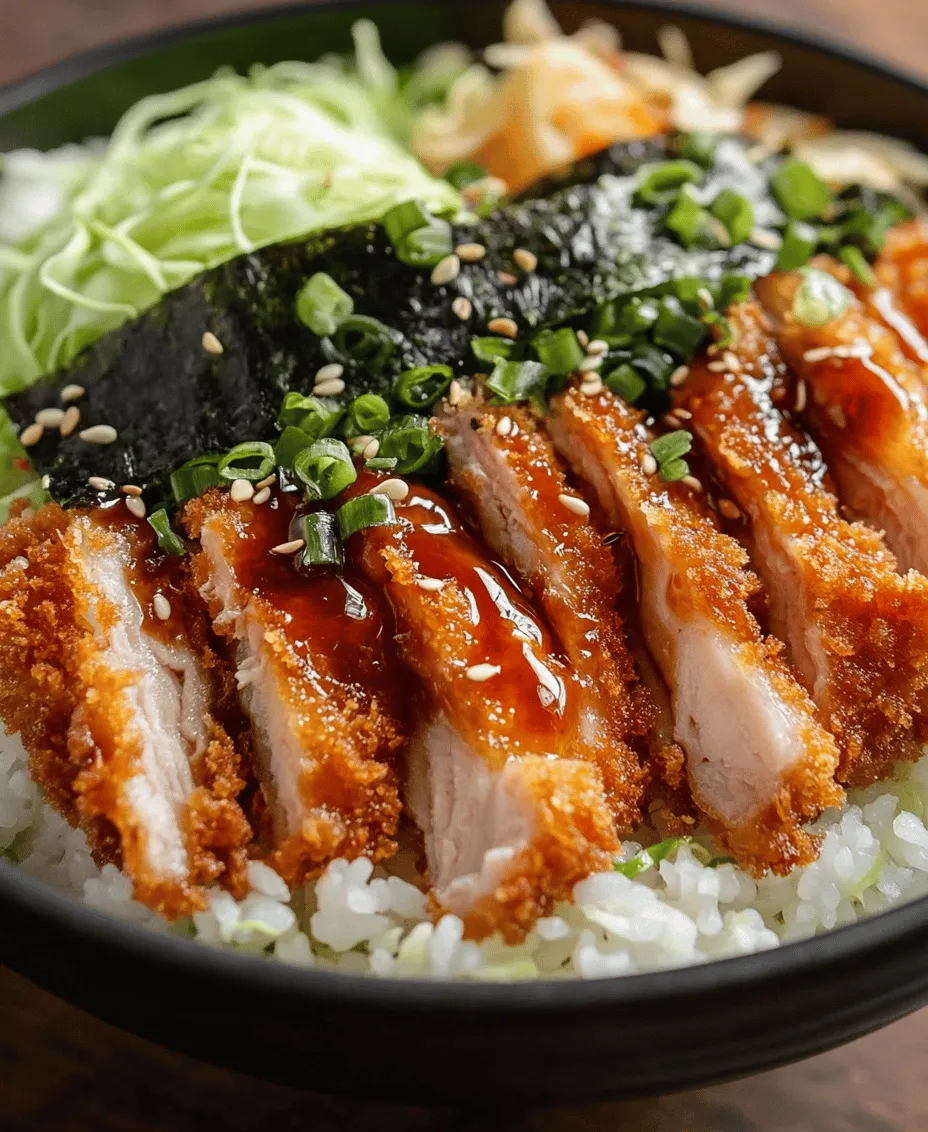
Layering Technique for Presenting Katsu Bowls Attractively
Start with a base of fluffy, steamed white rice or Japanese short-grain rice at the bottom of a bowl. This provides a neutral canvas that absorbs the flavors of the dish. Next, slice the fried pork chops into strips and arrange them attractively over the rice. Aim for a balance between aesthetics and practicality, ensuring each slice is visible and easy to access.
Role of Each Ingredient in the Bowl
1. Rice
The rice not only acts as the base but also complements the rich flavors of the pork. A sprinkle of furikake (a Japanese seasoning mix) can add an extra layer of flavor.
2. Cabbage
Shredded cabbage is essential for adding a refreshing crunch that contrasts with the fried pork. You can use green cabbage, red cabbage, or a mix of both for a colorful presentation. Toss the cabbage with a bit of rice vinegar, sesame oil, and a touch of sugar for a simple slaw.
3. Garnishes
Finish the bowl with garnishes like sliced green onions, sesame seeds, and a drizzle of tonkatsu sauce for a sweet and tangy flavor. Additionally, a wedge of lemon or lime can provide a zesty kick.
Discussion on Serving Styles and Variations
Katsu Bowls can be served family-style, where a large bowl is placed in the center of the table, allowing diners to help themselves. Alternatively, individual servings can be prepared, which is especially useful for meal prep or parties. For a twist, consider using other proteins like chicken or tofu for a vegetarian version.
Serving Suggestions and Pairings
To elevate your Crunchy Katsu Bowls, consider these serving suggestions and pairings that enhance the overall dining experience.
Recommendations for Side Dishes
Pair your Katsu Bowl with simple yet complementary side dishes such as:
– Miso Soup: A light and savory soup that warms the palate.
– Edamame: Steamed and lightly salted, they add a healthy protein boost.
– Pickled Vegetables: A small serving of pickled daikon or cucumbers brings a tangy contrast.
Beverage Pairings
Beverages can enhance your meal further. Consider these options:
– Alcoholic Options: A crisp lager or light Japanese sake pairs well with the richness of Katsu. If you prefer wine, a chilled Sauvignon Blanc works beautifully.
– Non-Alcoholic Options: Serve iced green tea or a refreshing yuzu soda for a bright, citrusy complement.
Ideas for Incorporating Seasonal Vegetables
Incorporate seasonal vegetables into your Katsu Bowl for added nutrition and flavor. Spring asparagus, summer zucchini, or fall squash can be grilled or sautéed and placed alongside your Katsu for a colorful and nutritious addition.
Health Considerations
While Katsu Bowls are undeniably indulgent, there are ways to enjoy them while being mindful of health.
Analysis of the Nutritional Profile
A typical Katsu Bowl is rich in protein from the pork, carbohydrates from the rice, and vitamins from the vegetables. However, it can also be high in calories and fat due to the frying process. A balanced serving should include plenty of vegetables and a reasonable portion of rice and meat.
Discussion About Balancing Indulgence with Healthy Eating Habits
To enjoy Katsu Bowls while maintaining healthy eating habits, consider the following strategies:
– Portion Control: Serve smaller portions of rice and meat while increasing the volume of vegetables.
– Whole Grain Options: Use brown rice or quinoa instead of white rice for added fiber and nutrients.
– Baking Instead of Frying: For a lighter version, try baking the breaded pork chops in the oven until crispy.
Suggestions for Making the Dish Lighter or Vegan-Friendly
For those seeking a lighter or plant-based option, substitute the pork with eggplant, tofu, or tempeh. Bread and fry them in the same manner, and you’ll have a delicious vegan Katsu Bowl that retains the essence of the original dish.
Conclusion
Crunchy Katsu Bowls are more than just a meal; they represent the joy of cooking and sharing delicious food with loved ones. The process of preparing this dish—from selecting the right ingredients to mastering the frying technique—brings satisfaction and a sense of accomplishment.
As you explore this delightful recipe, remember that cooking is an opportunity to experiment and personalize traditional dishes. Whether you’re enjoying a quiet dinner at home or hosting a gathering, Katsu Bowls can easily adapt to any occasion.
Sharing meals has cultural significance, symbolizing togetherness, comfort, and love. So, gather your family and friends, create your own Crunchy Katsu Bowls, and savor the flavors and memories that come from sharing home-cooked dishes. Enjoy every bite!